CICD with Jenkins
As the name suggests, 'Continuous integration and continuous deployment' is a continuous cyclic process in which software code is continuously pushed, merged, build, deployed, and tested. In a fast-paced development cycle, the above process might be cumbersome and time consuming which can affect the delivery cycle. To overcome this, we can automate the entire process with the help of a DevOps tool. This article will cover:
1. Introduction to DevOps
2. Job chaining in Jenkins
3. Install and setup Jenkins
4. Create an upstream job in Jenkins to deploy the build
5. Create a webhook in Bitbucket to trigger the Jenkins job
6. Get public IP for localhost through Ngrok utility
7. Create a downstream job in Jenkins to trigger automation test
8. CICD Execution in Jenkins

What is DevOps ?
DevOps is a collaboration practice among developers, operations teams, and testers. Jenkins is one of the DevOps tools which supports numerous plugins for varied DevOps needs. Jenkins is an open-source server developed by apache.
In the real world, in a software project team, there are some developers who write code in their local machines and check-in their code in a common development repository may be SVN, bitbucket or GitHub. Now the operations team is responsible to fetch and build this integrated code and make sure that the integrated code builds successfully. After a successful build, the operations team has to deploy the code in the target environment. Once deployed, the test team has to perform a regression or sanity test suite on the deployed code to make sure that the newly deployed code didn't break the existing working modules. This continuous cycle of check-in, build, deploy, and test, is called CI/CD. All these activities can be automated using the Jenkins DevOps tool. We'll see one by one how this can be achieved.
Job chaining in Jenkins for building, deploying and testing
We can achieve this with the help of job chaining. I've created two freestyle jobs in jenkins. The first job will be triggered when a developer pushes his code in a remote branch and then his code is merged in master by the approver or reviewer. As soon as the code is merged in master, my first job i.e. 'test' will be triggered and it will fetch the development code from bitbucket and build it (Refer below section on how to create a webhook). After a successful building, you can see the dev code is appearing in the workspace of this job. Once successfully build, the same job will deploy the code at some server. In this case, it will deploy the code in the tomcat server. And this server is currently running at localhost.
Now as soon as the first job is successfully done i.e. successfully build, and successfully deployed, my second job i.e. 'test2' will be triggered. This will build an automation script that is residing at another repository and execute the test scripts on the deployed code. This is job chaining. Now in the following sections, we'll see this step by step:
Jenkins installation and setup
Download Jenkins from the link-
https://www.jenkins.io/download/
Select the environment according to your machine.
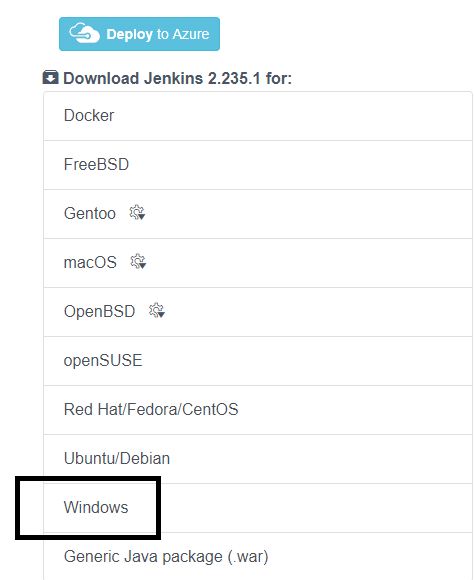
Extract the zip file and Run the msi file after the download completes. Start the jenkin server with this command:
java -jar jenkins.war

Launch jenkins by opening the browser and typing http://localhost:8080
Your jenkins server is setup on your local machine.
Create upstream job in Jenkins to build and deploy
Assuming Jenkins installation is successfully completed, and Jenkins server is started, the user can launch the jenkins in browser by typing the above url, (jenkins is running at port 8080 by default)
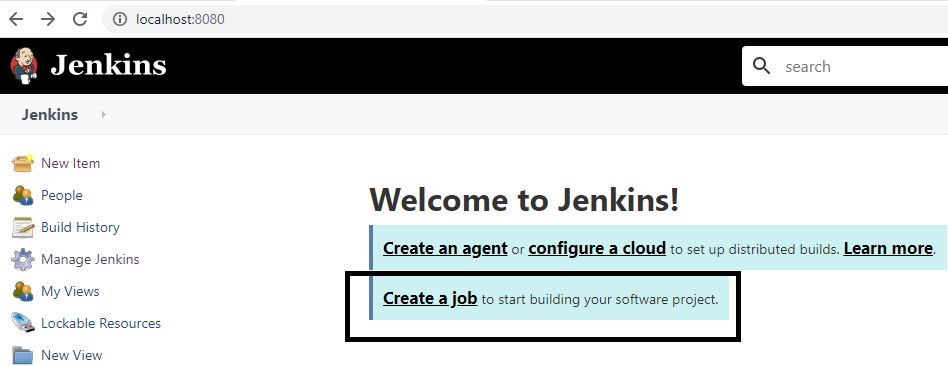
Click on "create a new job", give it a name (I've given 'test') and select freestyle project.

Now configure this job. Click on the "configure" button at the left navigation bar
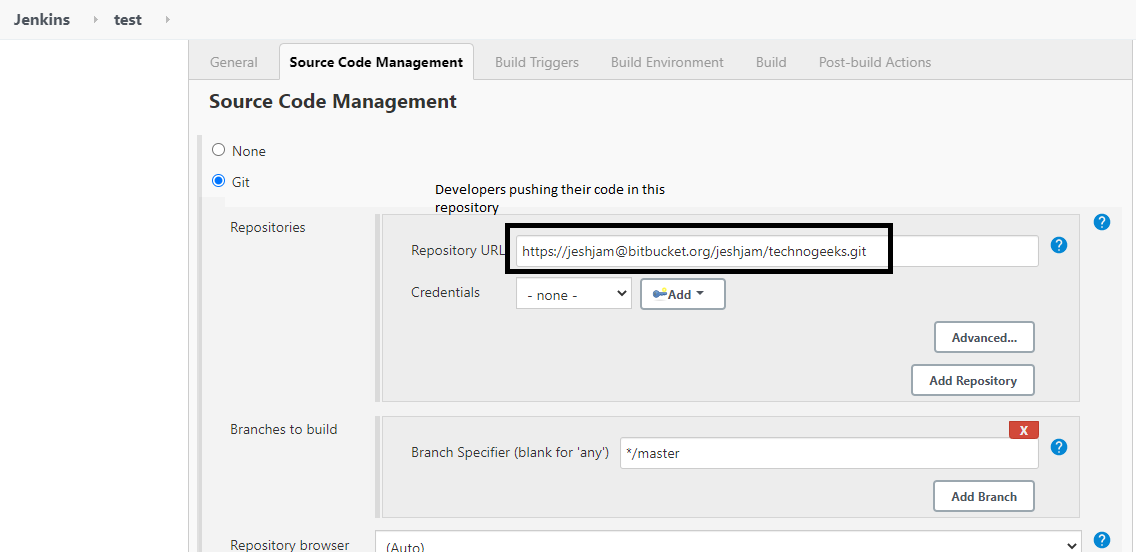
You can see different tabs. Leave the 'General' tab as default, and go to "Source code management" tab. Now in SCM tab, select Git, and give the repository URL where developers are pushing their code.
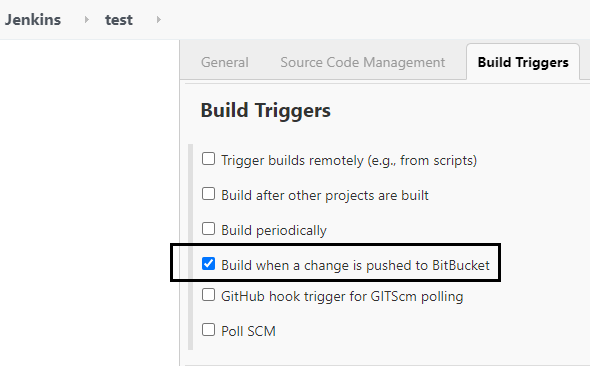
Now go to the 'Build triggers' tab, and check 'Build when a change is pushed to Bitbucket'. This means, whenever a developer's code is merged in the master branch of the above given dev repository, jenkins will fetch the dev code from the repository, trigger the build process, and workspace will be created for the compiled developer's code.
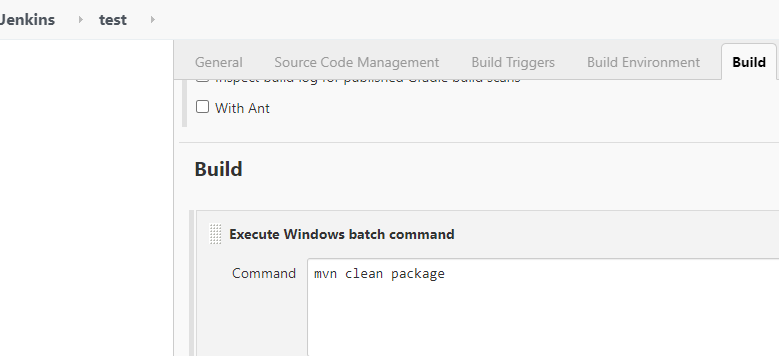
Now go to 'Build' tab, select 'Execute windows batch command' and type maven command 'mvn clean package', we are doing this because we need a war file of our maven web project to be created after the build is successful.
Now lastly, go to 'Post build actions' tab and select 'Deploy war/ear to a container'.
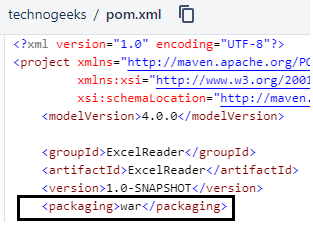
Here what we're doing is, we are deploying the war file created in build process, to our tomcat server i.e. we're deploying our website to a server. (Make sure to define the packaging as 'war' in pom.xml of your web project.) This will create a war file after the build is successful.
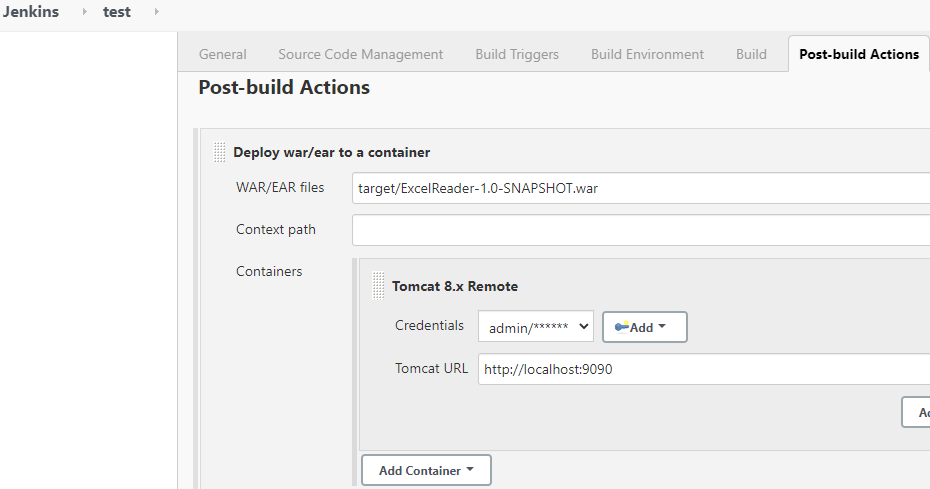
Give the target location where your war file will be deployed to the server, followed by the name of the war file.
In the container section, select tomcat server and give the admin credentials of the server, along with url of the server.
Here, both our jenkins and tomcat are running on local host therefore the port for both should be different. i.e if jenkins is running on port 8080, then we've to change the port of tomcat. We can change the port of tomcat by going to 'conf' folder of apache tomcat directory and open the server.xml. Here change the connector port to 9090. As you can see, we've our tomcat running on port 9090. See below the post build action of our upstream job.
Press save and apply. Now we have created our first upstream job 'test' but we haven't yet configured our bitbucket repository to jenkins. In the subsequent sections, we'll create webhook in bitbucket repository to configure or map our repo with jenkins job.
Create a web hook in bitbucket repository
Webhook is a machenism through which you can trigger a jenkins job as soon as a build is merged in master branch.
1. Go to the developer repository
2. Select 'Repository settings' from left navigation bar
3. Select webhook, and click 'Add new webhook'.
4. Give a name to this webhook, and enter the jenkins url in the URL field. Also check 'Repository push' in the 'Triggers' field.
Create a public IP for localhost
1. Since jenkins is running on local host, therefore bitbucket hook cannot recognize local url and you will get - "Invalid url" error while creating a webhook. You have to make it a public one. To do so, use ngrok utility. Download the utility from -"https://ngrok.com/download" and extract the zip, and run its exe whenever you want to convert your local port into a public one as shown below.
2. Click ngrok.exe, enter the command 'ngrok.exe http 8080', hit enter. This will give you a public IP of your localhost 8080 port.
3. Use ngrok to convert localhost into a public one. This is a mandatory step as bitbucket cannot consider local host, it requires a public ip otherwise it will give 'invalid url' error message.

This will give you a public url for your localhost port 8080, as below:
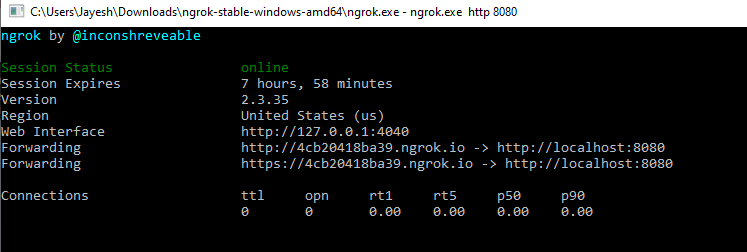
Now use this public url in your bitbucket webhook, and don't forget to append /bitbucket-hook/ at the end of this url. So the complete url would be http://4cb20418ba39.ngrok.io/bitbucket-hook/

Now you have configured your Jenkins job and bitbucket repo. Whenever a developer pushes his code in this repo, and as soon as his code gets merged in the master branch, this webhook will trigger the Jenkins job i.e. 'test'. This 'test' job will first build and then deploy the war file in the tomcat server.
Now in the subsequent section, we'll create another job 'test2' which will be a downstream job for 'test' i.e. this 'test2' will trigger a test automation run on the above deployed build.
Create a downstream job in Jenkins to trigger automation test
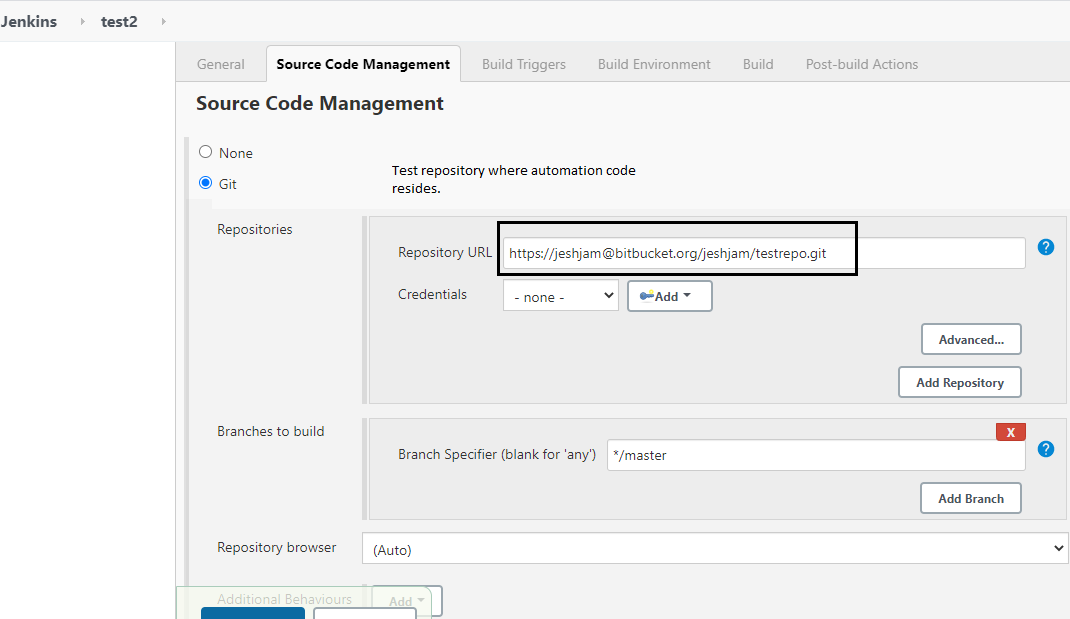
This second job 'test2' will be a downstream job for the first one. This will be triggered when first job is successfully executed i.e. successfully build and deployed. This job will build and execute the test automation script on deployed code. Go to jenkins, click 'create new job', give it a name (I've given 'test2'), select freestyle project. Now go to 'Source code management' tab, check 'Git', and give the url of your test repository where your test automation code resides.
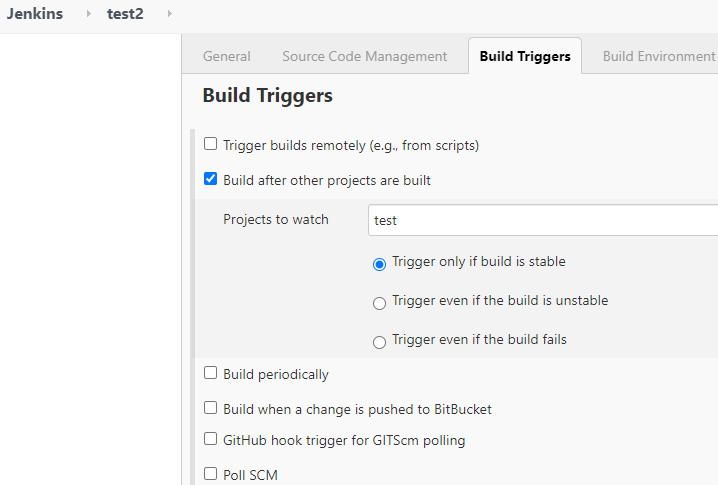
Now Go to the 'Build triggers' tab, check 'Build after other projects are built', and from the 'projects to watch' dropdown, select the first (upstream) job i.e. 'test'. Also select 'Trigger only if build is stable'.
This means this downstream job i.e. 'test2' will be triggered only if the first job is successfully completed. In other words the second job will be triggered when the development build is successfully built and deployed to the server.
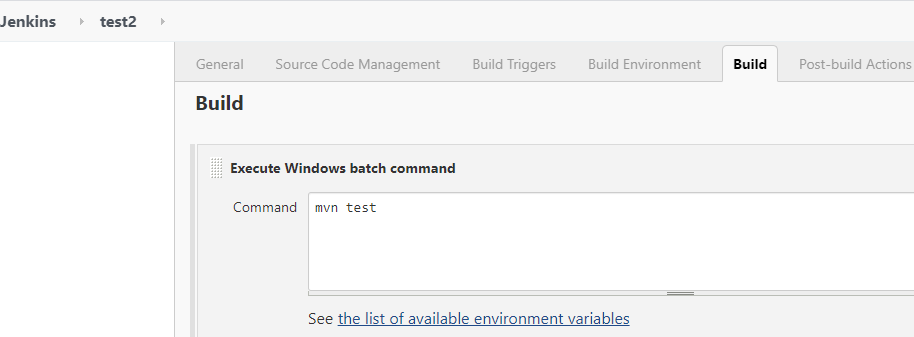
Now go to 'Build' tab and select 'Execute windows batch command'.
Type 'mvn test' in the 'command' field. This command will trigger pom.xml of our automation test which is residing in our test repo.
Now we're done with both the jobs.
CICD execution in Jenkins
In the developer's repository, update the code and merge it in master. The webhook will trigger the 'test1' job which will build and deploy the web project in the tomcat server. To cross check whether the web project is deployed to tomcat or not, you can go to the tomcat directory and check webapps folder. In webapps folder, you should see a folder named after your war file. Go inside this folder, you can see web-inf and meta-inf folders.

Once the web project is build and deployed, the second job 'test2' will execute which will execute test automation on the deployed web project.
Below pictures dipicts, the first job 'test' executes first, and after successful execution of first job, second job 'test2' will execute.
When first 'test' is executing, second is waiting.

When the first is successful, then only the second one executes.

