
Organize and manage your Test Cases with TestNG

This article will cover:
1. Introduction to testNG
2. Writing first testNG test
3. Grouping of test cases in testNG
4. Sequencing of test cases in TestNG
5. Parameterization in TestNG
6. Parallel execution of tests in testNG
7. Configuring multiple test suites in testNG
8. Handling pre/postconditions in testNG
9. Dataprovider in testNG
What is TestNG ?
TestNG is a unit testing framework designed on the concept of JUnit and NUnit, but the wide range of annotations provided by TestNG helps us in achieving broader testing goals like unit testing, integration testing, and end-to-end testing.
Grouping, Sequencing, Prioritization, and Parameterization of test cases are some of the core automation architectural goals which we can easily achieve with the help of TestNG.
Also with the help of listener interfaces, we can perform a wide range of operations on a particular event. It also gives us the flexibility to perform parallel execution of our test cases.
TestNG uses the testng.xml file to configure all the test methods, test classes, and test suites.
Every test class has to be configured in testng.xml.
We can also create multiple test suites for our testing need like - sanity suite, regression suite, smoke suite, and
configure them in testng.xml for better organization and management of test suites.
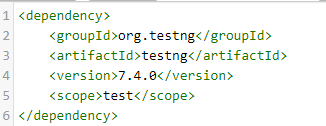
Include Maven TestNG dependencies in the maven's pom.xml if you are using the Maven project or download the TestNG jars directly and include the jars in the build configuration.
Writing and executing first TestNG test
In TestNG, we use @Test annotation to define our test method or test case. So any method on which @Test annotation is written is our test case or test method. In this method, you will perform the test execution and perform validation i.e. whether the actual result is matching with expected using assertion. To execute this test method, you need to define the test class in which this test method is written in testng.xml.
Grouping of test cases in TestNG
'groups' is one of the attributes of @Test annotation. This attribute helps us in
defining the group and include the test methods in that group. Once the test method is
bound with a group, that test method is executed only when the group is included in the testng.xml configuration file.
Suppose you have multiple test classes and those test classes have multiple test methods in them. Now you want only a few from each class should be executed and not all based on your test plan.
Here grouping comes into the picture where you can group your test cases/test methods belonging to different test classes.
For e.g. you have a regression suite and a smoke suite. You want a few sets of test methods to get executed during smoke suite execution and another set of test methods during regression.
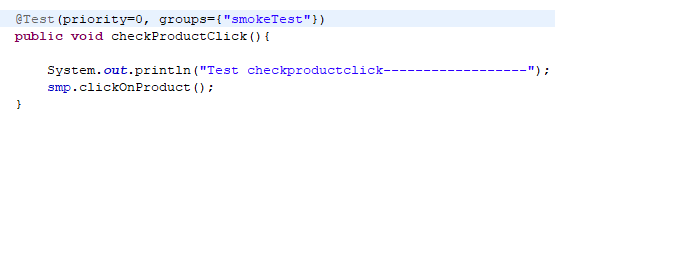
Here there is a test class called subMenuPageTest, inside which there is a test method called checkProductClick(). As you can see from the below image, this test method belongs to "smokeTest" group.
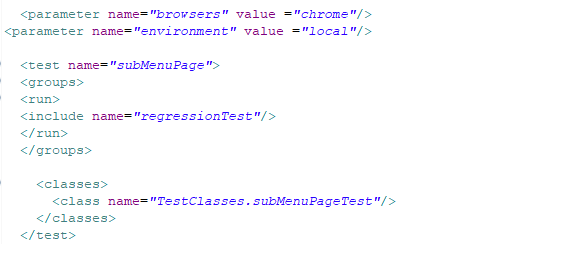
In the subsequent image, there is our testng.xml where we have included the group "regressionTest" in our test tag.
This means execute only those test methods from class subMenuPageTest which belongs to "regressionTest" group. So when we execute this xml,
only those test methods from class subMenuPageTest will be executed which belongs to the regression group and not the ones which belong to the 'smokeTest' group.
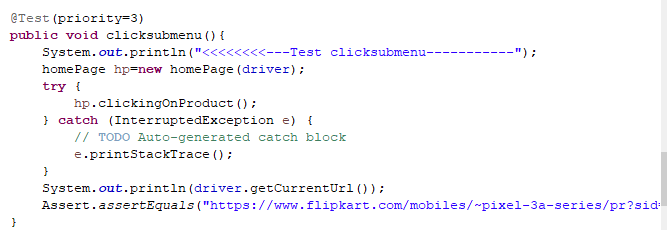
Sequencing of test cases in TestNG
The sequencing of test methods can be achieved through the 'priority' attribute under @Test annotation. If you have multiple test methods in your test class and you want your test cases/test methods to execute in a particular order or sequence then you can use priority attribute with @Test annotation. Zero is the highest priority. For e.g.
Test(priority=0)
public void testSubmit_btn(){
}
Test(priority=1)
public void testClick_add_icon(){
}
here, testSubmit_btn() will execute first, while testClick_add_icon() will execute second as priority of testSubmit_btn() is highest.
Parameterization in TestNG
You may want to execute your tests with different sets of parameters. For e.g. you want to execute your tests on a particular browser, or on a particular OS, or on a particular environment like Test, QA, UAT, etc., on the local environment, or on the cloud, etc.
For this, you can define a method accepting these parameters, and based on the parameters your condition will be executed.
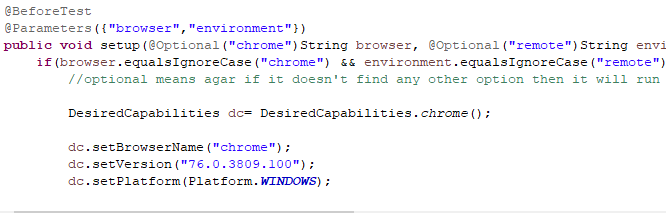
In the below image you can see there is a method which is accepting two parameters- 'browser' and 'environment'. Based on these parameters, the respective conditions will be invoked ie. if you pass browser as 'chrome' and the environment as 'local' then the respective 'if' condition will be executed and the chrome driver setting with local web driver initialization will happen.
If you pass the environment as 'remote' then the respective 'if' condition related to the remote web driver setting will execute where remote web driver initialization will happen.
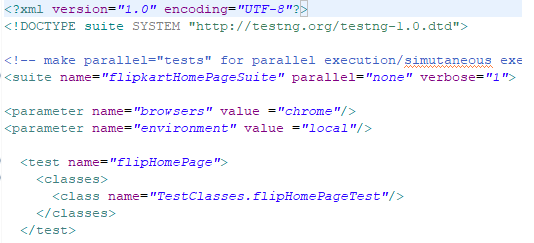
Now you might be wondering where does this parameter passing will happen? This parameter passing will happen through testng.xml
In the below image you can see that we are passing 'chrome' as browser, and 'local' as the environment.
Parallel execution of tests in TestNG
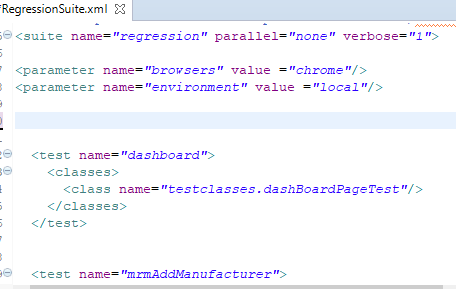
You have seen the structure of our testng xml. There is a suite, and inside the suite, there are multiple tests and these tests are mapped with test classes.
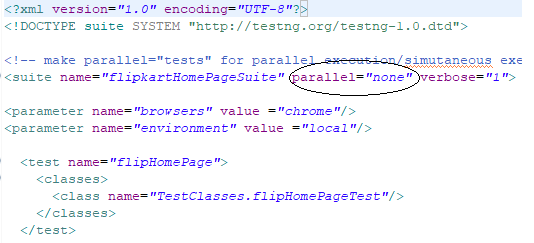
You might want to execute all your tests specified in the testng.xml in parallel or simultaneously.
To do so you can set the 'parallel' attribute in testng xml to "tests". Its default value is "None". By changing it to "tests", all your tests start executing simultaneously.
Configuring multiple test suites in TestNG
You can also create multiple XML suites and configure these suites in testng.xml file.
Instead of creating suites and tests in testng.xml, you can create separate XML suites and configure those suites in testng.xml.
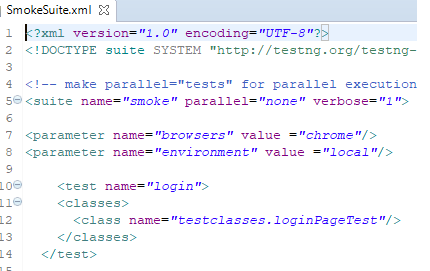
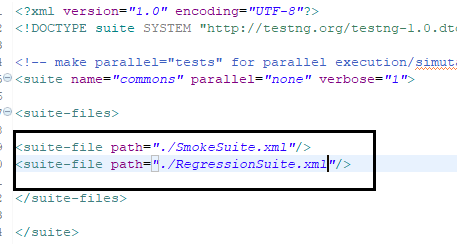
Below are two test suites one is a smoke suite and another one is a regression suite.
Smoke suite:
Regression Suite:
Now configure these two suites in testng.xml
When you execute testng.xml, first, the smoke suite will execute and then regressionSuite. This way you can manage multiple suites as per your requirement.
Handling preconditions and postconditions in TestNG
You might have observed that there are some preconditions that have to be executed before executing your test case. For e.g.
Suppose you want to validate the "My Account" section of Amazon, and under "My Account" you want to validate "your orders" etc. But before reaching the "My Account" section you first need to login into your amazon account.
So "login" to your amazon account will be one of the preconditions of your "My Account" section test case.
TestNG provides various annotations like:
@Beforeclass
@BeforeTest
@BeforeMethod
@BeforeSuite
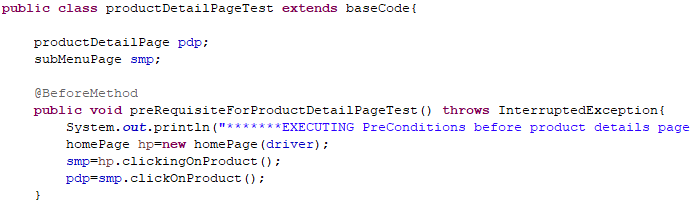
In the below image you can see that there is a test class called productDetailPAgeTest. This class has a test method or rather I would say a test case called addToCart().
But before adding to the cart, you need to select a product or category from the home page, and then select product from sub menu page and finally add the product to the cart from productDetail page.
So clicking the product on home page and then selecting the product from sub menu page are the pre conditions for executing addTocart() Test case.
So what is happening here is your previous test cases become preconditions for your next test cases. i.e. Your add to cart test case will become a precondition for checkout related test cases.
So what I've done is, I've written all my preconditions for addToCart test case under @BeforeMethod annotation.
This @BeforeMethod annotation will execute before every @Test method defined in your class. Suppose you have 5 test cases or test methods in your test class, so the method under @BeforeMethod annotation will execute every time before execution of any @Test method of your class.
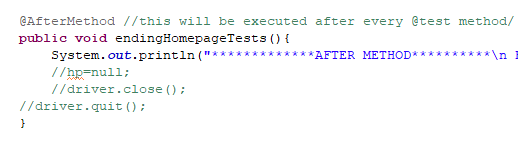
You can also put postconditions under @AfterMethod annotation which will execute every time after a @Test method is executed in a class.
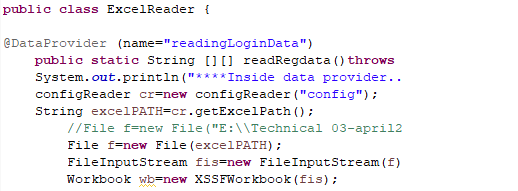
Dataprovider in TestNG
As the name suggests a Data provider method provides data to the test methods. A Data provider is another attribute of @Test annotation. In the below image you will see there is a utility class "ExcelReader" which will read all the data from an external file i.e. xlsx and store the entire data into a two-dimensional array. @Dataprovider annotation will be applied to this utility method and a name is given to this dataprovider. We've given the name "readingLoginData" to this data provider.
Now our test method will call this utility method through the name of data provider i.e. "readingLoginData". and you also need to specify the class name where this dataprovider resides.

Also please note that the test method "testInvalidLogin()" will accept as many parameters as there are columns in the datasheet. For e.g. if the datasheet has two columns namely "username" and "password" then the test method should accept these two as parameters.
And the @Test method i.e. "testInvalidLogin()" will execute as many times as there is a number of rows in the datasheet. For e.g. there are 4 sets of data in a datasheet then our test method will execute 4 times each with different sets of data.
We'll see testng listeners and other @Test attributes in upcoming posts.....